Frames in Tkinter (GUI Programming) – Python Tkinter Tutorial
Frames-Tkinter Python provides vast number of libraries for GUI application development. Tkinter is the widely used library for GUI application development. Using Tkinter library of python which carries large numbers of widgets, we can easily create Graphical User Interface for our application.
Frames: In Tkinter, Frame is the widget mainly used for organizing widgets and also for the process of grouping of other widgets in an easy and friendly manner. It is very difficult to arrange all widgets of application on same window so what we do is, we divide our complete area of application in several frames and place our application widgets on each frames.
Then at last, we will arrange our frames in our application as per requirement. Hence frames makes our complex task easy for arranging widgets.
![]()
Syntax:
z = frame( root, options)
Parameters:
- root: It represents main window or we can say parent window of our application.
- options: Various options are available to use with frame widgets. These are given below:
1). bd: This option represents the width of the border radius. The default value of border is 2 pixels only.
2). bg: This option represents the background color of our frame.
3). height: This option represent the vertical height of our frame.
4). width: This represents the horizontal dimension of our frame.
5). relief: This is the border type of the frame. Available types of border are: SUNKEN, Flat etc.
 Let’s have an example to understand in better
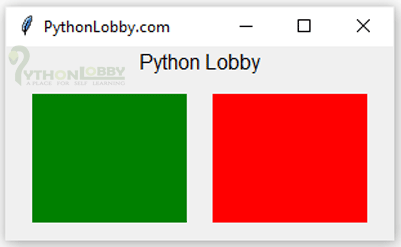
Example 1: Here in this example, I will only show you how frame is placed in our application window. We will use frames with widget in next example.
from tkinter import *

#root window
root = Tk()
#label
label = Label(root, text ='Python Lobby', font = "60")
label.pack()
#bottom frame
bottom_frame = Frame(root, bg="green", width=120, height=100)
bottom_frame.pack(side=LEFT, padx=20)
#top_frame
top_frame = Frame(root, bg="red", width=120, height=100)
top_frame.pack(side=LEFT)

root.geometry("300x150")
root.mainloop()
Output:


Explanation:
- First we have imported all the required libraries and modules of tkinter using import *.
- Then we have initialized root as object for Tk() class for creating root window.
- Here we have placed a label on our root window.
- Now we have created two frames top_frame and bottom_frame. We have used root, bg, width and height as parameter along with our frames.
- The new thing here is, that we have used side and padx attributes with pack geometry manager. Attribute side used to align our widget as per our requirement. If we are using side=LEFT, it means we are setting our widget alignment to left. If we do not use this attribute then each frame will cover full width. Here I am talking about frame widget only. We can see our frames placed easily, but when we place any widget on our frame then in that case our frame will hide behind the widget placed. It will be more clear in our next example.
Example 2:
from tkinter import *

#root window
root = Tk()
#label
label = Label(root, text ='Python Lobby', font = "60")
label.pack()
#top_frame
top_frame = Frame(root, bg="red", width=120, height=100)
top_frame.pack(side=LEFT)
#bottom frame
bottom_frame = Frame(root, bg="green", width=120, height=100)
bottom_frame.pack(side=LEFT, padx=20)

#button 1
b1 = Button(top_frame, text="Python", fg="green")
b1.pack()
#button 2
b2 = Button(bottom_frame, text="Lobby", fg="red")
b2.pack()
#button 3
b3 = Button(bottom_frame, text=".Com", fg="red")
b3.pack()

root.geometry("300x150")
root.mainloop()
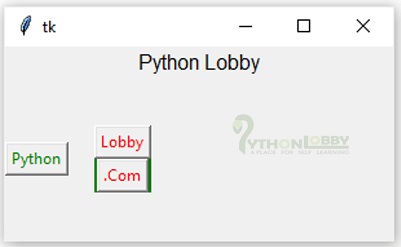
Output:


Explanation:
- All the steps are same as explained above, but the only difference here is that, we have used button widgets and placed that buttons on our frames instead of root or parent window.
- Before frames were easily visible but when we have placed button widget then the size of frames have re-adjusted as per the size of widgets.
- Now if we have to align our widgets, instead of moving our widgets we can easily move our frames as well.
- Frames are really helpful when developing or designing large and professional applications.