Pack Geometry Manager in Tkinter (GUI Programming)
In this chapter of our Python GUI programming, we have introduced the layout managers or geometry managers. Tkinter possess three layout managers.
For setting or placing widgets on our GUI Applications, we use some layouts ie. Pack Layout, Grid Layout & Place Layout. These layouts are used to place our widgets at some particular positions on our GUI Applications. These layouts are called Geometry Managers.
![]()
Geometry Manager/Layout Manager: The layout management or geometry management which are used for placing widgets on GUI Application window. These are called Geometry Managers/Layout Managers.
Types of Geometry Managers:-
We’ll discuss each geometry managers in detail one by one.
1). Pack(): The Pack is the easiest to use out of the other three layout managers. With the use of pack command, we can declare the positions of widgets relative to each other. Pack command takes care of the details. It is the easiest layout managers to implement. For developing simple or small gui applications, use of pack geometry manager is preferrable.
Example 1:
# geometry manager - pack
from tkinter import *

root = Tk()

w = Label(root, text="Red Zone", bg="red", fg="white")
w.pack()
w = Label(root, text="Green Glossy", bg="light green", fg="white")
w.pack()
w = Label(root, text="Yellow Yuga", bg="yellow", fg="red")
w.pack()

root.geometry("250x140")
root.mainloop()
Output:
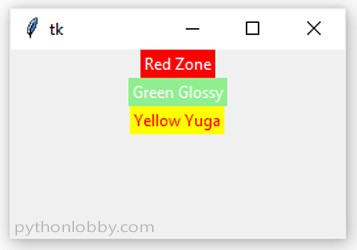
So we can see that in example, by the use of pack layout manager each label has been given the size of the text and also it has been placed on top of each other. And only those background areas colored which are covered by the text. If we want to customize more than we can use some attributes along with the pack layout manager.

Attributes we can use with Pack Geometry manager:
- fill
- padding
- side
(i). Fill: This is used to fill the complete area (with background color) ie. horizontal(x) or vertical(y).
(ii). Padding: It is used to give padding to the element with respect to x-axis or y-axis.
(iii). Side: It is used to place the element at a particular side it may be RIGHT or LEFT.
Let’s understand each term with the help of an example:-
Example 2: In this example we will understand about “fill“ attribute in pack geometry manager.
# Geometry Manager - Pack Layout
from tkinter import *

root = Tk()
root.title("PythonLobby.com")

w = Label(root, text="Red Zone", bg="red", fg="white")
w.pack()

# Fill-attribute
w = Label(root, text="Green Glossy", bg="light green", fg="white")
w.pack(fill=X)
w = Label(root, text="Yellow Yuga", bg="yellow", fg="red")
w.pack()

root.geometry("250x140")
root.mainloop()
Output:
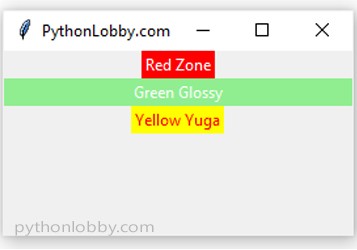
Note: Same way, we can also implement it for Y-axis also.
Example 3: In this example we will understand about “padding“ attribute in pack geometry manager.
# Geometry Manager - Pack Layout
from tkinter import *

root = Tk()
root.title("PythonLobby.com")

w = Label(root, text="Red Zone", bg="red", fg="white")
w.pack()
w = Label(root, text="Green Glossy", bg="light green", fg="white")
w.pack()

# Padding-attribute
w = Label(root, text="Yellow Yuga", bg="yellow", fg="red")
w.pack(pady = 20)

root.geometry("250x140")
root.mainloop()
Output:
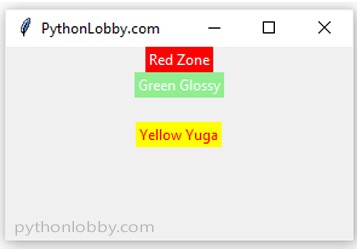
Note: Same we can use for X-axis also ie. pack(padx = 20)
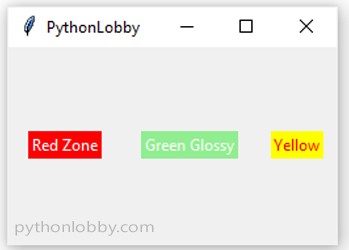
Example 4: In this example we will understand about “side“ attribute in pack geometry manager.
# Geometry Manager - Pack Layout
from tkinter import *

root = Tk()
root.title("PythonLobby")

w = Label(root, text="Red Zone", bg="red", fg="white")
w.pack(padx=15, pady=10, side=LEFT)
w = Label(root, text="Green Glossy", bg="light green", fg="white")
w.pack(padx=15, pady=10, side=LEFT)
w = Label(root, text="Yellow", bg="yellow", fg="red")
w.pack(padx=10, pady=10, side=LEFT)

root.geometry("250x150")
root.mainloop()
Output: