Tree View Widget in Tkinter (GUI Programming) – Python Tutorial
Tree View Widget in Tkinter Python provides a vast number of libraries for GUI application development. Tkinter is the widely used library for GUI application development. Using the Tkinter library of python which carries large numbers of widgets, we can easily create a Graphical User Interface for our application.
Tree View Widget: The tree view widget in Tkinter allows us to set up our widgets in a tree-like structure along with their attributes. We can remove add or remove nodes/widget dynamically as per the requirement of our GUI application.
![]()
Syntax:
treeview = ttk.Treeview(root, height=7).pack()
treeview.insert('','0','item1', text="First Item")
treeview.insert('','1','item2', text="Second Item")
treeview.insert('','2','item3', text="Third Item")
#moving items
treeview.move('item2','item1', 'end')
treeview.move('item3','item1', 'end')
Let’s see some example to understand this concept better
Example 1:
from tkinter import *
from tkinter import ttk

root = Tk()
label = Label(root, text="This is TreeView Widget").pack(side=TOP, pady=10)

treeview = ttk.Treeview(root, height=7)
treeview.pack()
treeview.insert('','0','item0', text="First Item")
treeview.insert('','1','item1', text="Second Item")
treeview.insert('','2','item2', text="Third Item")
treeview.insert('','3','item3', text="Fourth Item")
treeview.insert('','4','item4', text="Fifth Item")
#moving items
treeview.move('item1','item0', 'end')
treeview.move('item2','item0', 'end')

root.geometry("350x220")
root.title("PythonLobby.com")
root.mainloop()
Output:
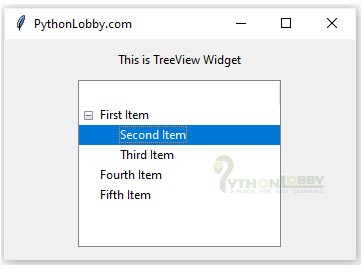

Explanation:
- First, we have imported all the required libraries and modules of Tkinter using import *.
- Then we have initialized root as an object for Tk() class for creating a root window.
- Next, we have added a label widget in our application window.
- In the very next line, we have initialized the tree view object with a Treeview widget with attributes height.
- Now we inserted items into our treeview widget using the insert function or method of the tree view widget.
- Next, we aligned the items as sub-items as per our requirement.
- Note: In the tree view, we cannot use the command for the click event. Here we have to use the bind function to make it work as a click event.
- Please follow the next example for more elaboration.
Example 2: Advance Example on Tree View widget with click event.
In this example, we will see how we can use the bind function for performing a double click operation on the tree view.
from tkinter import *
from tkinter import ttk

root = Tk()
label = Label(root, text="This is TreeView Widget").pack(side=TOP, pady=10)
#event function
def callback(event):
    item=treeview.identify('item',event.x, event.y)
    print("Your clicked on {}".format(treeview.item(item,"text")))
treeview = ttk.Treeview(root, height=7)
treeview.pack()
treeview.insert('','0','item0', text="First Item")
treeview.insert('','1','item1', text="Second Item")
treeview.insert('','2','item2', text="Third Item")
treeview.insert('','3','item3', text="Fourth Item")
treeview.insert('','4','item4', text="Fifth Item")
#moving items
treeview.move('item1','item0', 'end')
treeview.move('item2','item0', 'end')
#bind operation
treeview.bind('',callback)

root.geometry("350x220")
root.title("PythonLobby.com")
root.mainloop()
Output:
Explanation:
- First, we have imported all the required libraries and modules of Tkinter using import *.
- Then we have initialized root as an object for Tk() class for creating a root window.
- Next, we have added a label widget in our application window.
- In the very next line, we have initialized the tree view object with a Treeview widget with attributes height.
- Now we inserted items into our treeview widget using the insert function or method of the tree view widget.
- Next, we aligned the items as sub-items as per our requirement.
- Note: In the tree view, we cannot use the command for the click event. Here we have to use the bind function to make it work as a click event.
- Next, we used to bind with double click event and also we have defined a function named callback. Here in the function, we passed the parameter event.
- We passed one parameter i.e. event.
- In the function definition, we initialized item with identifies property followed by treeview object.
- This function is called when the user double clicks on the option of treeviw widget.
- We are just performing a print operation on function call or on event calling.