Place Geometry Manager in Tkinter (Place Layout)
In Python GUI programming, we need layout managers or geometry managers to place our tkinter widgets in our application. Tkinter possess three layout managers.
![]()
For setting or placing widgets on our GUI Applications, we use some layouts ie. Pack Layout, Grid Layout & Place Layout. These layouts are used to place our widgets at some particular positions on our GUI Applications. These layouts are called Geometry Managers.
Types of Geometry Managers:-
In this tutorial, we will discuss Place() Layout Manager in detail. We have already learnt about Pack() and Grid() layout manager in our previous tutorial.
1). Place(): The Place geometry manager in tkinter is the simplest as compared to the other three general geometry managers provided by Tkinter. It allows us to explicitly set the position and size of a window, either in absolute terms, or relative to another window.
We can access the place geometry manager through the place() method which is available and can be used for all standard widgets provided by tkinter in python.
Syntax:
widget.place(x ,y)
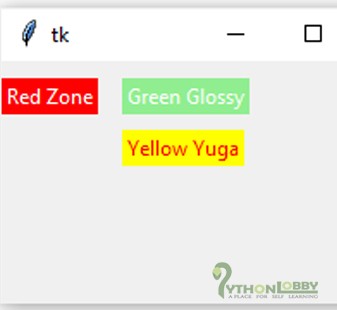
Example 1 :
# geometry manager - place
from tkinter import *

root = Tk()

w = Label(root, text="Red Zone", bg="red", fg="white")
w.place(x=0 , y=10)
w = Label(root, text="Green Glossy", bg="light green", fg="white")
w.place(x=70 , y=10)
w = Label(root, text="Yellow Yuga", bg="yellow", fg="red")
w.place(x=70 , y=40)

root.geometry("250x140")
root.mainloop()
Output:
Note: Place() geometry manager is free to use. Using place() geometry manager we can place our widget anywhere without any limitation.

Attributes we can use with Place Geometry manager:
- anchor
- bordermode
- height
- width
- relheight
- relwidth
- relx
- rely
- x
- y
The place() manager or layout manager places widgets in a specific position in the application widget area. The place() geometry manager uses the attributes anchor, bordermode, height, width, relheight, relwidth,relx, rely, x and y.
- Anchor: This attribute indicates where the widget to be anchored. It takes compass directions i.e. N, E, S, W, NE, NW, SE, or SW, which basically relates to the sides and corners of the application widget area. The default is NW.
- Bordermode: It has (Bordermode) two options i.e.
INSIDE, which indicates that the other options refer to the application widget area inside, (Ignoring the application area’s borders) andOUTSIDE, which is just the opposite of the same. - Height: It specifies the height of the widget in pixels.
- Width: It specifies the width of the widget in pixels.
- Relheight: Height as a float value between 0.0 & 1.0, as a fraction of the height of the application area.
- Relwidth: Width as a float value between 0.0 & 1.0, as a fraction of the width of the application area.
- Relx: Horizontal offset as a float value between 0.0 &1.0, as a fraction of the width of the application area.
- Rely: Vertical offset as a float value between 0.0 and 1.0, as a fraction of the height of the application area.
- X: It specifies horizontal offset in pixels.
- Y: It specifies vertical offset in pixels.
Let’s understand it better with the help of an example:
Example 1:
#example place_geometry_attributes
from tkinter import *

root = Tk()
bttn_hght = Button(root, text="40px hight")
bttn_hght.place(height=40, x=200, y=200)

bttn_wdth = Button(root, text="50px wider")
bttn_wdth.place(width=50, x=300, y=300)

bttn_relhght = Button(root, text="RelHeight of 0.5")
bttn_relhght.place(relheight=0.5)

bttn_relwdth= Button(root, text="RelWidth of 0.4")
bttn_relwdth.place(relwidth=0.4)

bttn_x=Button(root, text="X = 500px")
bttn_x.place(x=500)

bttn_y=Button(root, text="Y = 300")
bttn_y.place(y=300)

bttn_relx=Button(root, text="RelX of 0.4")
bttn_relx.place(relx=0.4)

bttn_rely=Button(root, text="RelY of 0.8")
bttn_rely.place(rely=0.8)

root.title("PythonLobby")
root.geometry("500x500")

root.mainloop()
#source code from (riptutorial.com)
Output:
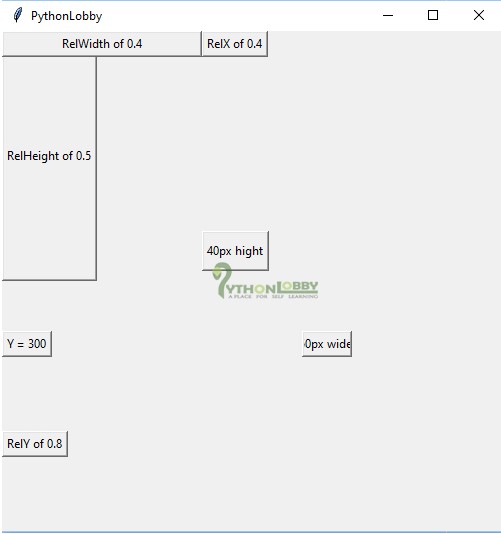
The attributes used in place geometry manager is much understandable, if you do it practically by own. I personally recommend you to practice the concepts of geometry manager by self.