Message Box in Tkinter (GUI Programming) – Python Tkinter Tutorial
Python provides vast number of libraries for GUI application development. Tkinter is the widely used library for GUI application development. Using Tkinter library of python which carries large numbers of widgets, we can easily create Graphical User Interface for our application.
MessageBox: In Tkinter, MessageBox is the widget used for user interactions or sometimes used for getting input actions from user. It is used to display the message in python applications especially when any action is going to be performed to get user confirmation.
![]()
Syntax:
mbox = messagebox.Func_name(title, message , options)
Parameters or Arguments:
- Func_name: Here we can use the pre-defined functions of message box. There are several functions of message box.
These are the methods available in the message box widget.
- showinfo(): It is used to show some information to the user.
- showerror(): It is used to display the error message to the user.
- askquestion(): It is used for getting input from user as yes or no.
- showwarning(): It is used to show the warning to the user.
- askyesno(): It is used for getting input from user as yes or no.
- askokcancel(): It is used to confirm user’s action before performing any activity on application.
- title: This parameter is of string type, here we have to specify the title of our message box.
- message: This parameter is also of string type, here we have to print the message that we want to display to the user.
- options: Well! we can pass many options here, but for now we will discuss only icons as option rest we will discuss later in our mega projects.
icons– we can use icon as options, as tkinter carry some of the icons along with some of their widgets and message box is one of them. Icons we can use: warning, info, etc.

Let’s have some examples to understand it much better
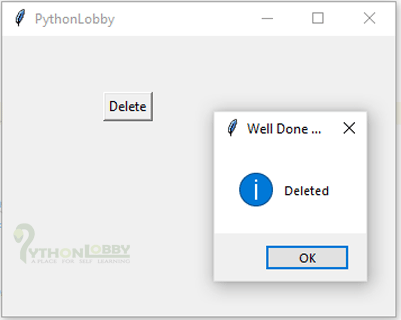
Example 1: Here in this example we are going to discuss showinfo() function or method of message box widget.
from tkinter import *
from tkinter import messagebox

#creating root window
root = Tk()

#function_definitions
def callback():
    messagebox.showinfo("Well Done Great !")
    print("You Clicked Delete")

#button 1
button1 = Button(root, text="Delete", command = callback )
button1.grid(row=0, column=0, padx=90, pady=50)

root.geometry('350x250')
root.title("PythonLobby")
root.mainloop()
Output:


Explanation:
Step 1: We imported all modules available in tkinter library of python including message box.
Step 2: We initialized root as object for Tk() class for creating root window.
Step 3: Here we have defined the callback() function & inside function we called the showinfo() function of message box using messagebox as object reference. This function is going to be invoke on the click of button.
Step 4: Here we have created a button and called the above defined function using command option and hence the whole program is executed performing above output.
Step 5: In the last we have set the dimension and title of our application window.
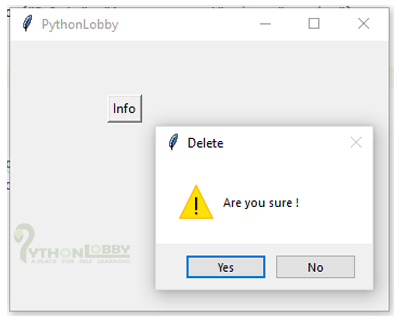
Example 2: Here in this example we are going to discuss askquestion() function or method of message box widget.
from tkinter import *
from tkinter import messagebox

#creating root window
root = Tk()

#function_definitions
def callback():
    m_box = messagebox.askquestion("Delete", "Are you sure !", icon="warning")
    if(m_box == "yes"):
        print("Yes")
    else:
        print("No")

#button 1
button1 = Button(root, text="Info", command = callback )
button1.grid(row=0, column=0, padx=90, pady=50)


root.geometry('350x250')
root.title("PythonLobby")
root.mainloop()
Output:

Explanation:
Step 1: We imported all modules available in tkinter library of python including message box.
Step 2: We initialized root as object for Tk() class for creating root window.
Step 3: Here we have defined the callback() function & inside function we called the showinfo() function of message box using messagebox as object reference. This function is going to be invoke on the click of button.
Step 4: Here we have created a button and called the above defined function using command option and hence the whole program is executed performing above output.
Step 5: In the last we have set the dimension and title of our application window.