Python Grid – Grid Geometry Manager in Tkinter
Python Grid Layout: In Python GUI programming, we need layout managers or geometry managers to place our Tkinter widgets in our application. Tkinter possesses three layout managers.
For setting or placing widgets on our GUI Applications, we use some layouts ie. Pack Layout, Grid Layout & Place Layout. These layouts are used to place our widgets at some particular positions on our GUI Applications. These layouts are called Geometry Managers.
Types of Geometry Managers:-
In this tutorial, we will discuss Grid(), Layout Manager in detail. We have already learnt about Pack() layout manager in our previous tutorial.
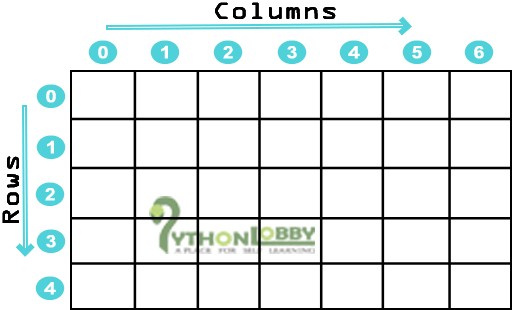
1). Grid(): The Grid geometry manager splits the whole application area in several rows and columns. It is same as a table which is two dimensional. It is the most flexible layout manager in Tkinter. Let’s take the below-given diagram to understand the Grid() Layout Manager in detail:

Note: Never mix grid() and pack() in the same master window.
Important: The area of our application where we place our widgets is split into rows and column same as I tried to show you using the above diagram. We can also observe that in our diagram that we have given the indexes to our rows and columns. We use these indexes to place our widgets. Let’s do this practically to understand it better.
Syntax: widget.grid(row, column) takes two necessary parameters i.e. row and column. Apart from this python grid layout also takes other parameters that have been described below in detail.
Example 1:
from tkinter import *

root = Tk()
root.title("PythonLobby")

w = Label(root, text="Red Zone", bg="red", fg="white")
w.grid(row=0, column=0)
w = Label(root, text="Green Glossy", bg="light green", fg="white")
w.grid(row=1, column=1)
w = Label(root, text="Yellow", bg="yellow", fg="red")
w.grid(row=2, column=2)

root.geometry("250x150")
root.mainloop()
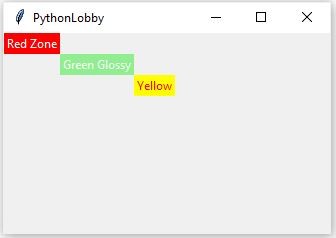
Output:

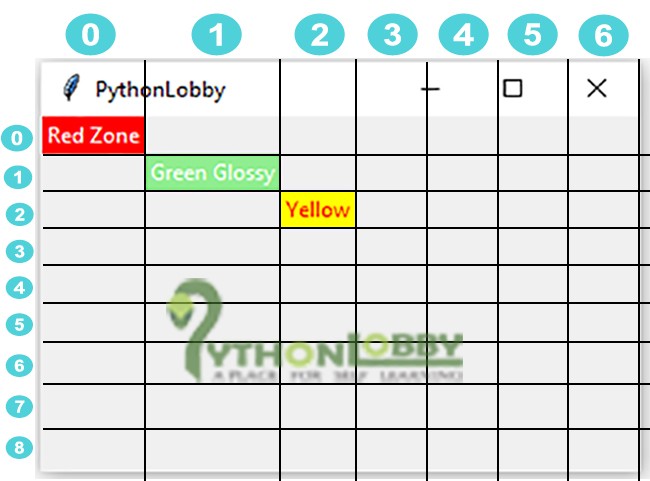
This is how our widgets placed in our application area. Actually, our application area is now split into rows and columns and hence our widget is placed. If you still confuse, please follow the below-given diagram where I have tried to make it more clear by visual diagram.

«Hence, this way our whole application area is split by grid geometry manager»

Attributes we can use with Grid Geometry manager:
- column
- columnspan
- padx
- pady
- ipadx
- ipady
- row
- rowspan
- sticky
The grid() geometry manager or layout manager organises widgets in a table-like structure. The application area is split into rows and columns, and each part of the table can hold a widget. It uses column, columnspan, ipadx, ipady, padx, pady, row, rowspan and sticky as an attribute. Out of these attributes column and rows are necessary. If we do not initialize the value of row and column it will take 0 as the default value.
- Column: The column in which to put a widget in. The default column value is 0.
- Columnspan: How many columns widget to takes up. The default value is 1.
- Padx: It is used to pad pixels widget horizontally outside the widget’s borders.
- Pady: It is used to pad pixels widget vertically outside the widget’s borders.
- Ipadx: It is used to pad pixels widget horizontally inside the widget’s borders.
- Ipady: It is used to pad pixels widget vertically inside the widget’s borders.
- Row: The row in which to put widget in. The default row value is 0.
- Rowspan: How many rows widget to takes up. The default value is 1.
- Sticky: When size of the widget is smaller than the size of the cell, then
stickyis used to indicate which sides and corners of the cell where the widget to stick. We can initialize sticky as the direction defined by compass directions i.e. N, E, S, W, NE, NW, SE, and SW & zero also. We can also use string concatenation, for example, NESW make the widget take up the full area of the cell.
Let’s see an example to make it more clear:
Example 2:
from tkinter import *

root = Tk()
root.title("PythonLobby")

w = Label(root, text="I'm in 3rd Column", bg="red", fg="white")
w.grid(column=3)
w = Label(root, text="I've columnspan of 3", bg="light green", fg="white")
w.grid(columnspan=3)
w = Label(root, text="I've ipadx of 5", bg="yellow", fg="red")
w.grid(ipadx=5)
w = Label(root, text="I've ipady of 4", bg="green", fg="red")
w.grid(ipady=4)
w = Label(root, text="I've padx of 3", bg="blue", fg="yellow")
w.grid(padx=3)
w = Label(root, text="I've pady of 3", bg="red", fg="white")
w.grid(pady=3)
w = Label(root, text="I'm in row 3", bg="green", fg="white")
w.grid(row=3)
w = Label(root, text="I've rowspan of 2", bg="blue", fg="white")
w.grid(rowspan=2)
w = Label(root, text="I'm stuck to north-east", bg="red", fg="white")
w.grid(sticky=NE)

root.geometry("250x150")
root.mainloop()
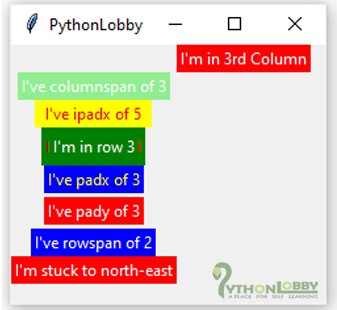
Output:
